Xcode
Xcode自动管理证书文件模式下更新provisioning profile文件
添加设备到develop.apple.com Xcode切到相应的target的General tab下,然后点击(!)按钮展示provisioning profile文件详情,然后拖动左上角的profile图标到终端获取provisioning profile文件名
打开~/Library/MobileDevice/Provisioning Profiles目录,然后删除相同文件名的provisioning profile文件
Xcode会自动下载最新的provisioning profile文件
Xcode 打包发布
打包证书
1
2
打包证书最多只有三个,需要根据提示文字选择正确的证书。 若证书创建后一直无法正常使用,重启后即可
若无法发布正式,可以发布TestFlight版本测试
Xcode 11打包上传时,一直卡在Authenticating with the App Store…
xcode shift+command+k 清除缓存
open ~/Library/Caches/com.apple.amp.itmstransporter/ 删除文件夹内的所有文件 /Applications/Xcode.app/Contents/SharedFrameworks/ContentDeliveryServices.framework/Versions/A/itms/bin/iTMSTransporter 在终端输入 (亲测在这里打开VPN会快很多,下载内容大概60M+)百度云 [wk8u]下载完后,重启Xcode
设置推送证书(两种方式
token Authentication
创建APNs推送服务Key。Certificates, Identifiers & Profiles -> Keys -> JPush Auth Key
⚠️下载完成的是一个.p8文件,只允许下载一次,注意保存
证书
Certificates, Identifiers & Profiles -> Identifiers -> 指定Bundle ID -> 勾选并配置 Push Notifications -> Production SSL Certificate -> 下载.cer证书安装
在钥匙串中导出Apple Push Services: Bundle ID为.p12;最好设置一下密码
fix Code signing “.framework” failed;IPA processing failed 请使用xcframework重构frameworkadd as (New Run Script Phase)
1
2
3
4
5
6
7
8
9
10
11
12
13
14
15
16
17
18
19
20
21
22
23
24
25
26
27
28
29
30
31
32
33
34
35
36
37
38
39
40
41
42
43
44
# Type a script or drag a script file from your workspace to insert its path. APP_PATH="${TARGET_BUILD_DIR}/${WRAPPER_NAME}" # This script loops through the frameworks embedded in the application and # removes unused architectures. find "$APP_PATH" -name '*.framework' -type d | while read -r FRAMEWORK do FRAMEWORK_EXECUTABLE_NAME=$(defaults read "$FRAMEWORK/Info.plist" CFBundleExecutable) FRAMEWORK_EXECUTABLE_PATH="$FRAMEWORK/$FRAMEWORK_EXECUTABLE_NAME" echo "Executable is $FRAMEWORK_EXECUTABLE_PATH" EXTRACTED_ARCHS=() for ARCH in $ARCHS do echo "Extracting $ARCH from $FRAMEWORK_EXECUTABLE_NAME" lipo -extract "$ARCH" "$FRAMEWORK_EXECUTABLE_PATH" -o "$FRAMEWORK_EXECUTABLE_PATH-$ARCH" EXTRACTED_ARCHS+=("$FRAMEWORK_EXECUTABLE_PATH-$ARCH") done echo "Merging extracted architectures: ${ARCHS}" lipo -o "$FRAMEWORK_EXECUTABLE_PATH-merged" -create "${EXTRACTED_ARCHS[@]}" rm "${EXTRACTED_ARCHS[@]}" echo "Replacing original executable with thinned version" rm "$FRAMEWORK_EXECUTABLE_PATH" mv "$FRAMEWORK_EXECUTABLE_PATH-merged" "$FRAMEWORK_EXECUTABLE_PATH" done
Xcode配置
修改类的Copyright、类前缀
TARGETS -> General -> File inspector(right panel) -> Project Document 下就有版权信息和前缀修改
修改默认语言为中文
info.plist 添加或者修改Localization native development region值为China; localized resources can be mixed值为yesPROJECT -> info -> 添加简体中文语言包
右击.xcodeproj显示包内容,修改project.pbxproj中的developmentRegion为zh-Hans
删除英文语言包后若需要再添加,确保中文语言包在首位
Swift 笔记
视图
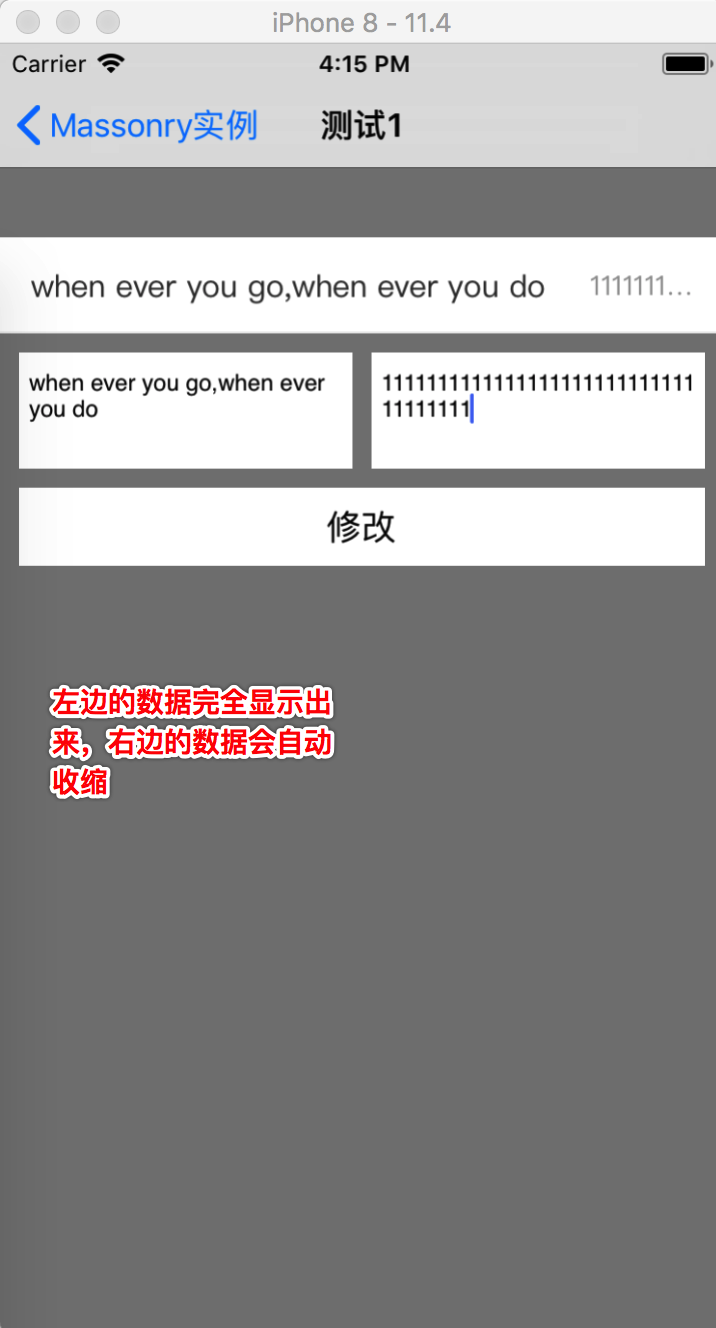
自适应容器的高度
一个视图,包含n个子视图,如何才能自适应高度呢?
第一个子视图顶部对齐父视图
最后一个子视图底部对齐父视图
其余的子视图顶部依次对其上一个子视图的底部
同理,横向改成左边/右边对齐
类似微信相册的翻转动画
预览页
1
2
3
4
5
self .navigationController? .pushViewController(vc, animated: false )if let view = self .navigationController? .view { UIView .transition(with: view, duration: 1 , options: .transitionFlipFromRight, animations: nil ) }
从vc页跳回
1
2
3
4
5
6
7
@objc func done () if let view = navigationController? .view { UIView .transition(with: view, duration: 1 , options: .transitionFlipFromLeft, animations: nil ) } self .navigationController? .popViewController(animated: false ) }
改变动画时背景为黑色
1
2
3
view.backgroundColor = .black 或者 UIApplication .shared.keyWindow? .backgroundColor = .black
1 2 3 4 5 6 7 let animation: CAKeyframeAnimation = CAKeyframeAnimation ()animation.keyPath = "transform.scale" animation.values = [1.0 , 1.3 , 0.9 , 1.0 ] animation.duration = 0.25 animation.calculationMode = kCAAnimationCubic btn.layer.add(animation, forKey: nil )
UIView 和 XIB 的相关执行顺序
在controller中通过类方法获得一个关联的UIView(playView.swift/.xib)对象,其执行顺序为:
由 instantiate 方法获得视图对象:let v = nib.instantiate(withOwner: self, options: nil)[0] as! PlayView
期间 instantiate 方法调用 awakeFromNib() 执行相应的操作,执行完后再接着执行 instantiate 方法后面的步骤
执行完获得UIView对象的类方法后,在执行 layoutSubviews() 设置视图大小
UIView的setNeedsLayout, layoutIfNeeded 和 layoutSubviews 方法之间的关系解释
layoutSubviews在以下情况下会被调用:
init初始化不会触发layoutSubviews
addSubview会触发layoutSubviews
设置view的Frame会触发layoutSubviews,当然前提是frame的值设置前后发生了变化
滚动一个UIScrollView会触发layoutSubviews
旋转Screen会触发父UIView上的layoutSubviews事件
改变一个UIView大小的时候也会触发父UIView上的layoutSubviews事件
layoutSubviews方法:这个方法,默认没有做任何事情,需要子类进行重写
setNeedsLayout方法: 标记为需要重新布局,异步调用layoutIfNeeded刷新布局,不立即刷新,但layoutSubviews一定会被调用
layoutIfNeeded方法:如果,有需要刷新的标记,立即调用layoutSubviews进行布局(如果没有标记,不会调用layoutSubviews)
如果要立即刷新,要先调用[view setNeedsLayout],把标记设为需要布局,然后马上调用[view layoutIfNeeded],实现布局
语言国际化
在PROJECT -> Info -> Localizations 添加想要适配的语言。选中后去掉stroyboard的勾选去掉
在工程文件中创建新的文件右键New File -> Resource -> Strings File,取名为Localizable.strings
.strings下会多出两个字文件,分别对应英文和中文的Strings。如果没有,只需在右侧控制栏的inspector->Localization点击本地化即可分别编写语言参数(注意:结尾要有分号; )
1
2
"hello" = "你好" ; "hello" = "hello" ;
获取参数值
1 NSLocalizedString ("hello" , comment: "default" )
快捷使用。新建Localizable.swift,声明多语言文字
1
2
3
4
5
6
7
8
9
enum Localizable : String case hello var localized: String { return NSLocalizedString (rawValue, comment: "" ) } } print (Localizable .hello.localized)
若想修改项目显示名称,则创建InfoPlist.strings文件。只需在右侧控制栏的inspector->Localization点击本地化即可
1 CFBundleDisplayName = "project-name" ;
Xcode 本地化 修改默认的开发语言
PROJECT -> Info -> Localizations添加中文简体语言在Info.plist中查找并设置Localization Native Development Region值为China
关闭Xcode,右击.xcodeproj显示包内容,以文本形式打开project.pbxproj文件,查找并替换developmentRegion属性值为zh-Hans
(可选)看情况删除knownRegions数组里的字段
保存后重启Xcode即可看到默认语言变更为中文简体
AVPlayer获取当前时间戳截图
声明
1
2
3
4
fileprivate var player: AVPlayer !fileprivate var playerItem: AVPlayerItem ?fileprivate var playerLayer: AVPlayerLayer !fileprivate var videoOutput: AVPlayerItemVideoOutput = AVPlayerItemVideoOutput ()
初始化播放控制url
1
2
3
playerItem = AVPlayerItem (url: withURL) playerItem? .add(videoOutput) player.replaceCurrentItem(with: playerItem)
获取截图
1 2 3 4 5 6 7 8 9 10 11 12 13 14 15 func getCurrentImage ()UIImage ?{ let itemTime = player.currentItem? .currentTime() let pixelBuffers = videoOutput.copyPixelBuffer(forItemTime: itemTime! , itemTimeForDisplay: nil ) guard let pixelBuffer = pixelBuffers else { return nil } let ciImage = CIImage (cvPixelBuffer: pixelBuffer) let temporaryContext = CIContext () let videoImage = temporaryContext.createCGImage(ciImage, from: CGRect (x: 0 , y: 0 , width: CVPixelBufferGetWidth (pixelBuffer), height: CVPixelBufferGetHeight (pixelBuffer))) guard let image = videoImage else { return nil } return UIImage (cgImage: image) }
屏幕方向控制:只允许部分横屏(info.plist中只支持竖屏)
AppDelegate是否允许横屏
1 2 3 4 5 6 7 8 9 10 11 12 13 14 15 16 17 18 19 20 21 22 23 24 25 26 27 28 29 30 31 32 33 34 35 36 37 var isBlock = true { didSet { if isBlock { changeOrientation(fullScreen: ! isBlock) } } } func application (_ application : UIApplication , supportedInterfaceOrientationsFor window : UIWindow ?)UIInterfaceOrientationMask { return isBlock ? .portrait : .allButUpsideDown } func changeOrientation (fullScreen : Bool ) if fullScreen { if UIApplication .shared.statusBarOrientation.isLandscape { return } let resetOrientationTargert = NSNumber (integerLiteral: UIInterfaceOrientation .unknown.rawValue) UIDevice .current.setValue(resetOrientationTargert, forKey: "orientation" ) let orientationTarget = NSNumber (integerLiteral: UIInterfaceOrientation .landscapeRight.rawValue) UIDevice .current.setValue(orientationTarget, forKey: "orientation" ) }else { if UIApplication .shared.statusBarOrientation.isPortrait { return } let resetOrientationTargert = NSNumber (integerLiteral: UIInterfaceOrientation .unknown.rawValue) UIDevice .current.setValue(resetOrientationTargert, forKey: "orientation" ) let orientationTarget = NSNumber (integerLiteral: UIInterfaceOrientation .portrait.rawValue) UIDevice .current.setValue(orientationTarget, forKey: "orientation" ) } }
需要横屏的Controller中设置允许横屏
1 2 3 4 5 let delegate = UIApplication .shared.delegate as! AppDelegate delegate.isBlock = true delegate.isBlock = true
如需控制优先显示方向,改变排序即可
1
2
3
4
5
< key> UISupportedInterfaceOrientations </key>< array> < string> UIInterfaceOrientationLandscapeRight </string> < string> UIInterfaceOrientationLandscapeLeft </string> </ array>
监听锁屏/解锁通知
1
2
3
4
5
6
7
8
9
10
11
12
13
14
15
16
17
18
19
class AppDelegate ... public static let isLockScreenKey = "isLockScreenKey" func applicationProtectedDataWillBecomeUnavailable (_ application : UIApplication ) NotificationCenter .default.post(name: .ScreenLockStateChanged , object: nil , userInfo: [AppDelegate .isLockScreenKey: true ]) } func applicationProtectedDataDidBecomeAvailable (_ application : UIApplication ) NotificationCenter .default.post(name: .ScreenLockStateChanged , object: nil , userInfo: [AppDelegate .isLockScreenKey: false ]) } ... } public extension Notification .Name static let ScreenLockStateChanged = Notification .Name ("ScreenLockStateChanged" ) }
AVPlayer实现视频后台播放
对于实现后台播放视频的方法,我的理解是,iOS 是支持后台播放音频的,而 AVPlayer 在播放视频时,会将图像渲染在 layer 上,因此只要取消图像的渲染,只播放音频,就可以实现后台播放。
在info.plist文件中添加权限
1 2 3 4 5 6 7 8 9 <key > UIBackgroundModes</key > <array > <string > audio</string > </array > <key > NSAppTransportSecurity</key > <dict > <key > NSAllowsArbitraryLoads</key > <true /> </dict >
在播放控制类中添加监听(从相关的AVPlayer删除AVPlayer(将AVPlayerLayer player属性设置为nil))
1
2
3
4
5
6
7
8
9
10
11
12
func isVideoBackground () NotificationCenter .default.addObserver(self , selector: #selector(enterBackground), name: UIApplication .didEnterBackgroundNotification, object: nil ) NotificationCenter .default.addObserver(self , selector: #selector(willForeground), name: UIApplication .willEnterForegroundNotification, object: nil ) } @objc func enterBackground () } @objc func willForeground () }
AVPlayer 实现倍速播放
定义变量rate保存当前倍速
1 2 3 4 5 6 open var rate: Float = 1 { didSet { queue.rate = rate } }
每当暂停后播放,都需要设置rate,因为暂停/播放都会修改rate值为0/1
1
2
3
4
open func play () queue.play() queue.rate = rate }
逻辑
NSNotification通知的使用
方式一:
自定义通知类型
1 let WBUserShouldLoginNotification = “WBUserShouldLoginNotification "
发送通知
1 NotificationCenter .default.post(name: NSNotification .Name (rawValue: WBUserShouldLoginNotification )
注册 通知监听
1 NotificationCenter .default.addObserver(self , selector: #selector(notificationMethod(n:)), name: NSNotification .Name (rawValue: WBUserShouldLoginNotification ), object: nil )
处理通知的方法
1
2
3
@objc fileprivate func notificationMethod (n : Notification ) print (n) }
注销 通知监听
1 NotificationCenter .default.removeObserver(self )
方式二:更加贴近官方文档
自定义通知类型
1
2
3
extension NSNotification .Name public static let XXXNotification = NSNotification .Name ("XXXNotification" ) }
发送通知
1 NotificationCenter .default.post(name: .XXXNotification , object: nil )
注册 通知监听
1 NotificationCenter .default.addObserver(self , selector: #selector(notificationMethod(n:)), name: .XXXNotification , object: nil )
处理通知的方法
1
2
3
4
5
6
@objc fileprivate func notificationMethod (n : Notification ) guard let list = n.object as? [Int ] else { return } print (n) }
注销 通知监听
1 NotificationCenter .default.removeObserver(self )
自定义选择器Selector
声明Selector
判断是否绑定选择器responds(to:)
触发选择器perform(, with: )
extension 也可以添加限定条件,使得只有特定情况实现 protocol 才能获得默认实现
1
2
3
4
5
6
7
extension ForceTouchImagePreviewProtocol where Self : UIView } extension Array where Element :_ArrayType , Element .Generator .Element :Equatable }
OC & Swift 混编
Swift 调用 objc
桥接文件(ProjectName-Bridging-Header.h):新建OC文件时自动生成,也可以自己新建Header file后,在 Targets–>Build Settings–>Swift Compiler - General–>objc Bridging Header 配置文件路径(ProjectName/ProjectName-Bridging-Header.h)
使用时只需在桥接文件中导入头文件即可和 swift 一样使用
objc 调用 Swift
默认桥接文件(ProjectName-Swift.h):在 Targets–>Build Settings–>Swift Compiler - General–>objc Generated Interface Header Name 进行配置,默认文件名是工程名-Swift.h,一般不做改动
使用时首先在OC文件中要加上 #import “ProjectName-Swift.h”(名字组成:工程名-Swift)
混编注意事项:
1 2 3 4 5 class TestClass … .. }
更多
指针
系统权限设置
常用的权限:
说明
权限
描述
麦克风权限
Privacy - Microphone Usage Description
App需要您的同意,才能访问麦克风进行语音识别转换/录制音频,如禁止将无法识别语音转换/录制音频发送
相机权限
Privacy - Camera Usage Description
APP需要您的同意,才能访问相机进行拍摄/识别/视频通话,如禁止将无法拍摄/识别图片以及视频通话
保存相册权限
Privacy - Photo Library Additions Usage Description
App需要您的同意,才能将照片保存至相册,如禁止将无法保存图片
相册权限
Privacy - Photo Library Usage Description
APP需要您的同意,才能访问相册进行选择照片上传/发布信息,如禁止将无法上传选择照片上传/发布信息
通讯录权限
Privacy - Contacts Usage Description
APP需要您的同意,才能获取通讯录好友,如禁止将无法查看
蓝牙权限
Privacy - Bluetooth Peripheral Usage Description
APP需要您的同意,才能使用蓝牙播放/控制功能
语音转文字权限
Privacy - Speech Recognition Usage Description
APP需要您的同意,才能使用语音识别,如禁止将无法语音转文字
日历权限
Privacy - Calendars Usage Description
APP需要您的同意,才能添加任务到日历,如禁止将无法在日历中查看任务
定位权限
Privacy - Location When In Use Usage Description
APP需要您的同意,才能访问定位位置展示附近信息,如禁止将无法展示附近信息
定位权限
Privacy - Location Always Usage Description
APP需要您的同意,才能访问定位位置展示附近信息,如禁止将无法展示附近信息 ⚠️如非必要,不能申请该权限
定位的需要这么写,防止上架被拒。
App Transport Security Settings -> Allow Arbitrary Loads (true)
获取系统信息
1 2 3 4 5 6 7 8 9 10 11 12 13 14 15 16 func versionCheck () let infoDictionary = Bundle .main.infoDictionary let appDisplayName = infoDictionary! ["CFBundleName" ] let majorVersion = infoDictionary! ["CFBundleShortVersionString" ] let minorVersion = infoDictionary! ["CFBundleVersion" ] let appversion = majorVersion as! String let iosversion = UIDevice .current.systemVersion let identifierNumber = UIDevice .current.identifierForVendor let deviceName = UIDevice .current.name let systemName = UIDevice .current.systemName let model = UIDevice .current.model let localizedModel = UIDevice .current.localizedModel print ("appDisplayName:\(appDisplayName! ) \n majorVersion:\(majorVersion! ) \n minorVersion:\(minorVersion! ) \n " , "appversion:\(appversion) \n iosversion:\(iosversion) \n identifierNumber:\(identifierNumber! ) \n systemName:\(systemName) \n model:\(model) \n localizedModel:\(localizedModel) " ) }
获取当前Wi-Fi名
在iOS 12 之后需要设置Xcode -> [Project Name] -> Targets -> [Target Name] -> Capabilities -> Access WiFi Information -> ON
在iOS 13 以后获取Wi-Fi需要满足以下条件之一
使用定位功能,并且获得了定位服务权限的应用;
使用NEHotspotConfiguration配置过的Wi-Fi;
应用程序已安装有效的VPN配置
1 2 3 4 5 6 7 8 9 10 11 12 13 14 15 16 17 18 19 20 21 22 23 24 25 26 27 var currentSSID: String { let interfaces = CNCopySupportedInterfaces () var ssid = "" if interfaces != nil { let interfacesArray = CFBridgingRetain (interfaces) as! Array <AnyObject > if interfacesArray.count > 0 { for name in interfacesArray { let interfaceName = name as! CFString let ussafeInterfaceData = CNCopyCurrentNetworkInfo (interfaceName) if (ussafeInterfaceData != nil ) { let interfaceData = ussafeInterfaceData as! [String : Any ] ssid = interfaceData["SSID" ]! as! String } } } } return ssid }
关于 Swift 中重写 preferredStatusBarStyle 不起作用问题解决方案
首先需要在项目targets中的 info.plist 文件中将 View controller-based status bar appearance 删除;
如果UIViewController是存在于自定义的UINavigationController中,需要在自定义的UINavigationController中重写childForStatusBarHidden和childForStatusBarStyle两个方法: 因为这两个方法默认返回值是nil
1 2 3 4 5 6 7 8 override var childForStatusBarHidden: UIViewController ? { return self .topViewController } override var childForStatusBarStyle: UIViewController ? { return self .topViewController }
TableView
自定义cell
从xib创建cell
1 2 3 4 5 6 7 8 9 10 11 table.register(UINib (nibName: "TestCell" , bundle: nil ), forCellReuseIdentifier: TestCellID ) override class func awakeFromNib () super .awakeFromNib() setup() } let cell = tableView.dequeueReusableCell(withIdentifier: TestCellID , for: indexPath) as! TestCell
纯代码创建cell
1 2 3 4 5 6 7 8 9 10 11 12 13 14 15 16 17 18 19 20 21 22 23 24 25 class TestCell : UITableViewCell static func withTableView (_ tableView : UITableView , reuseIdentifier : String ? = nil )TestCell { let identifier = reuseIdentifier ?? TestCell .self .description() var cell = tableView.dequeueReusableCell(withIdentifier: identifier) as? TestCell if cell == nil { cell = TestCell (style: .default, reuseIdentifier: identifier) } return cell! } override init (style : UITableViewCell .CellStyle , reuseIdentifier : String ?) super .init (style: style, reuseIdentifier: reuseIdentifier) setup() } required init? (coder aDecoder : NSCoder ) super .init (coder: aDecoder) setup() } } let cell = TestCell .withTableView(tableView)
设置ui
1
2
3
4
5
func setup () backgroundColor = UIColor .clear contentView.backgroundColor = UIColor .clear selectionStyle = .none }
属性问题
table.tableFooterView = UIView() 去除多余的分割线table.separatorStyle = .none 隐藏分割线
自定义xib大小无法改变时
Attributes inspector -> Simulated metric: Size:inferred -> Size:Freeform
tableview是否注册cell
如果不想手动初始化cell实例,则注册class/nib,使用注册时需要携带indexPath参数
基于class的注册,使用registerClass方法
1 2 3 tableView.register(UITableViewCell .self , forCellReuseIdentifier: "identifier" ) tableView.dequeueReusableCell(withIdentifier: "identifier" , for: indexPath)
基于nib的注册,使用registerNib方法
1 2 3 tableView.register(UINib (nibName: "TestCell" , bundle: nil ), forCellReuseIdentifier: "identifier" ) tableView.dequeueReusableCell(withIdentifier: "identifier" , for: indexPath)
基于class的不注册,手动判别cell是否为空
1 2 3 4 5 var cell = tableView.dequeueReusableCell(withIdentifier: "identifier" ) as? TestCell if cell == nil { cell = TestCell (style: .default, reuseIdentifier: "identifier" ) }
基于nib的不注册,手动判别cell是否为空
1 2 3 4 5 var cell = tableView.dequeueReusableCell(withIdentifier: "identifier" ) as? TestCell if cell == nil { cell = Bundle .main.loadNibNamed("TestCell" , owner: self , options: nil )? .last as? TestCell }
TableViewCell的性能优化
1 2 3 4 5 6 7 8 self .layer.drawsAsynchronously = true self .layer.shouldRasterize = true self .layer.rasterizationScale = UIScreen .main.scale
优点:绘制cell更快,更高效
缺点:离屏渲染需要在 GPU/CPU 之间快速切换
关闭导航栏自动缩进
1
2
3
4
5
if #available (iOS 11.0 , * ) { scroll.contentInsetAdjustmentBehavior = .never } else { automaticallyAdjustsScrollViewInsets = false }
TableViewCell 设置间距,去除顶部间距
tableview 初始化estimated必须在view设置之前
1
2
3
4
let table = UITableView (frame: .zero, style: .grouped)table.estimatedSectionHeaderHeight = 0 table.estimatedSectionFooterHeight = 0 table.tableFooterView = UIView ()
代理设置间距
1
2
3
4
5
6
func tableView (_ tableView : UITableView , heightForHeaderInSection section : Int )CGFloat { return 0.1 } func tableView (_ tableView : UITableView , heightForFooterInSection section : Int )CGFloat { return 10 }
tableview 关闭延时点击
table.delaysContentTouches = false
添加一个scroll view
像普通视图一样为scroll view添加位置和大小的约束
在scroll view中添加一个子视图(content view),给该视图添加一个指定的标签(这个标签只是为了更好地显示)
将content view的left,right,top,bottom和scroll view的边界建立相等约束。那么现在content view的边界就确定了scroll view的内容区域
(注意此时content view还没有固定的大小,它可以根据你在其中设置的视图的伸缩大小)
(可选)如果不需要水平滑动,将content view的宽度设置为和scoll view的宽度相等。
(可选)如果不需要垂直滑动,将content view的高度设置为和scroll view的高度相等。
在content view中添加子视图,为子视图和content view添加约束。
重要: 你的布局必须能够决定content view的大小(除非在5和6中已经设置过了)。如果要基于你的内容的固有尺寸来决定高度,那么在content view的top跟bottom之间必须有一条不间断的约束链
iOS UITableViewCell 中 调整imageView 的图片大小
1
2
3
4
5
6
7
8
9
10
11
12
func tableView (_ tableView : UITableView , cellForRowAt indexPath : IndexPath )UITableViewCell { ... let itemSize = CGSize (width: 50 , height: 50 ) UIGraphicsBeginImageContextWithOptions (itemSize, _ : false , _ : UIScreen .main.scale) let imageRect = CGRect (x: 0.0 , y: 0.0 , width: itemSize.width, height: itemSize.height) cell.imageView? .image? .draw(in: imageRect) cell.imageView? .image = UIGraphicsGetImageFromCurrentImageContext () UIGraphicsEndImageContext () return cell }
UITableViewCell的分割线边距设置
1
2
3
4
5
6
7
8
9
10
11
12
func tableView (_ tableView : UITableView , willDisplay cell : UITableViewCell , forRowAt indexPath : IndexPath ) if cell.responds(to: #selector(setter: UITableView .separatorInset)) { cell.separatorInset = UIEdgeInsets (top: 0 , left: 75 , bottom: 0 , right: 0 ) if indexPath.row == (conversationModel.dataList.count - 1 ) { cell.separatorInset = .zero } } }
上架
备注说明
如果有使用VoIP,需要提供演示视频说明
如果有使用定位/后台相关功能,也需要视频演示
如果有内购,需要提供内购账号密码,并加以描述CNY 699元 是购买684金币
苹果登陆需要直接点击就可以使用app;若需要用户完善信息的,则需要提供能完整使用功能的测试账号
有金币等交易相关的商品,需要加入内购;可以只提供两个价格,一个最低,一个最高
注:以上视频需要拼接为一个,以附件形式上传,最好200M以内
Regarding Guideline 1.2 - Safety - User Generated Content
反馈描述:
1 对于用户上传的信息,我们有服务端的数据风控策略,会自动隐藏/封闭用户数据, 不需要做拉黑描述等
如果app内部有投诉/举报相关功能,最好提供演示视频以说明
xcode 构建版本被删除
隐私权限没有在info.plist里进行声明(⚠️查收appleid邮箱邮件
使用了Apple禁止使用的API
重新生成打包证书,retry!
 微信
微信 支付宝
支付宝